
How to Test Your Car's Alternator: A Car Owner’s Guide
Posted on May 31, 2025
That moment when your headlights dim at a stoplight or your battery warning light flickers on - your alternator might be sending an SOS. This unsung hero works tirelessly to power your car's electrical system and keep your battery charged, but when it fails, you're literally running on borrowed time.
The good news? Testing your alternator is simpler than most drivers think. With just a multimeter (a $20 tool that pays for itself instantly) and 10 minutes, you can diagnose problems before they leave you stranded.
At CarHub Caledon Chrysler, we've helped thousands of drivers become their own best mechanics - and in this guide, we'll show you exactly how to check your alternator's health like a pro.

What's a Car Alternator?
An alternator is an essential part of your car's electrical system. Its main job is to generate power to charge the battery and run electrical components like lights, radio, and air conditioning while the engine is running.
It works by converting mechanical energy from the engine into electrical energy using a process called electromagnetic induction.
In simple terms, an alternator has two key parts: the rotor and the armature coils. The rotor, powered by the car's engine, creates a magnetic field that rotates. As it spins, this magnetic field passes through the stationary armature coils, generating electricity.
This electricity is then used to charge the car's battery and supply power to electrical systems. Without a functioning alternator, your car's battery would eventually run out of power, leaving you stranded.
What Can Make an Alternator Faulty?
There are several common reasons why an alternator might fail and understanding these can help you identify potential issues. Here are some of the main causes:

1. Worn-Out Brushes
Alternator brushes are in constant contact with the slip rings, and over time, this can cause them to wear out. When the brushes wear down, they can no longer make a proper connection, leading to power issues.
Depending on the alternator design, the brushes can be replaced on their own, or you may need to replace the entire voltage regulator.

2. Damaged Bearings
The bearings in the alternator can become damaged or jammed due to natural wear and tear, poor repairs, or incorrect assembly. This can cause the alternator to make noise or stop working altogether.
3. Stator W3
If water or other liquids get onto the alternator, it can cause the stator winding insulation to burn out. This is especially common if you drive through puddles or wash the engine. The liquid can short-circuit the system, damaging the alternator.

4. Regulator Relay Failure
The alternator’s voltage regulator controls the output of the alternator. If it fails, the alternator may not charge the battery properly. Other issues, like a short circuit in the alternator’s wiring or problems with the battery, can also cause the regulator to fail.
5. Diode Bridge Failure
The diode bridge converts AC power to DC power. If the diodes fail, often due to heat from loose connections or issues with the battery, the alternator won't function properly.

How to Tell If Your Car’s Alternator Is Bad
Your car’s alternator is responsible for charging the battery and powering electrical systems while the engine is running. When the alternator starts to fail, it won’t be able to provide enough power to keep everything running smoothly, which can lead to a range of issues.
Here are some common signs that your alternator may be going bad:
- Dimming Lights: If you notice your headlights or dashboard lights dimming, especially when you accelerate or decelerate, it could be a sign that your alternator isn't providing enough power.
- Battery Warning Light: If the battery warning light on your dashboard comes on, it’s a strong indication that there’s an issue with the alternator or the charging system.
- Electrical Problems: Malfunctioning electrical components like the radio, air conditioning, or power windows can be caused by a failing alternator.
- Burning Smell: A burning rubber or wire smell could mean there’s an issue with the alternator’s components, like a damaged belt or wiring.
- Trouble Starting or Stalling: If your car struggles to start or stalls frequently, it could be due to a weak or dead battery caused by an alternator that's not charging properly.
If you experience any of these symptoms, it's a good idea to have your alternator checked to avoid further problems.

How To Test an Alternator?
A faulty alternator can cause problems like dimming lights or trouble starting the car. Here’s a simple process to test your alternator, helping you spot potential issues early and take action before they turn into bigger problems.
1. Locate the Alternator
The alternator is usually located near the top front of the engine. It has a round, vented metal housing with visible copper wiring inside. In most cars, the alternator is easy to spot once you open the hood.
2. Check the Engine's Drive Belt
A loose or worn drive belt can prevent the alternator from charging properly. To check it, locate the engine's drive or serpentine belt. Press on the belt between two pulleys to see if it moves too much. It should feel tight and not loose. If the belt is loose, it needs to be tightened before testing the alternator.
3. Listen to the Engine
The sounds your engine makes can help identify issues with the alternator. Start the car and listen for any unusual noises like grinding or squeaking. You can also use a rubber hose like a stethoscope. Place one end on the alternator housing and the other against your ear.
If you hear loud grinding or squeaking through the hose, it could mean a failed bearing inside the alternator, and the alternator may need replacing.
4. Test the Alternator with the Engine Off
To begin testing, turn off the engine and use a voltage meter. Set it to DC volts. Connect the positive lead to the battery’s positive terminal and the negative lead to the negative terminal. Check the meter; it should read around 12.5 volts. If it’s much lower, your battery might not be fully charged.
5. Test the Alternator with the Engine On
Start the engine and check the voltage meter again. It should read between 13.5 and 14.5 volts. To stress-test the alternator, turn on the car’s radio, headlights, and air conditioning.
If the voltage stays stable and doesn’t drop significantly, the alternator is working well. If it reads below 13 volts or doesn’t change when the engine is on, the alternator may be faulty.
6. Preparing the Multimeter
Before you start, set your multimeter to the voltage setting. If your multimeter has different voltage settings like 2, 20, 200, 2000, choose 20 DC volts. If there’s no incremental setting, just set it to DC volts. This ensures you get the correct readings for both your battery and alternator.
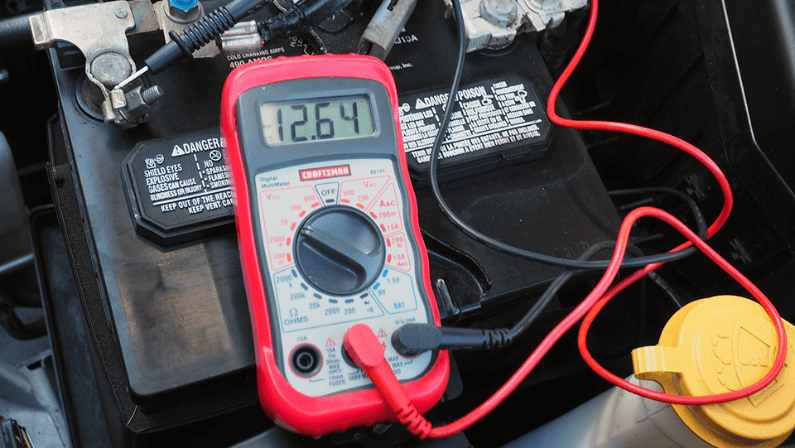
7. Checking Battery Voltage Before Starting the Engine
With the vehicle turned off, use the multimeter to check the battery voltage. Place the black probe on the negative (-) terminal and the red probe on the positive (+) terminal. If your battery is hard to access, use the jump terminals or a clean, unpainted bolt in the engine compartment for the negative probe.
8. Testing with the Engine Running
Start the engine and check the voltage again using the same method. With the engine running, the voltage should increase. A functioning alternator will show a reading between 14.0 to 14.5 volts. If it’s higher than 16.5 volts, there may be an issue with the alternator.
9. Check the Alternator Voltage
Once the engine is on, check the voltage reading. The alternator should be sending power to the battery, so the reading should be between 13.8 and 14.2 volts. If it’s lower, your alternator may not be charging the battery properly.
10. Check the Alternator Amperage
To test amperage, disconnect the voltmeter and connect an amperage meter to the battery the same way. Turn on all electrical systems in the car, like lights and the radio, and let the engine idle at about 1200 rpm. Check the car's manual for the alternator’s maximum amperage.
A 90-amp alternator should show around 88 amps. If the amperage is much lower than expected, the alternator may need to be replaced.

Troubleshooting Beyond the Alternator
If replacing your alternator doesn’t solve the problem, the issue might lie elsewhere in the electrical system. Here are some common areas to check and tips for diagnosing the issue:
1. Inspect Wires and Connectors
- Worn or Frayed Wires: Check the wiring between the alternator and battery for damage like cracks or frays, which can cause electrical problems.
- Loose or Corroded Connectors: Ensure all connections are secure. A loose or corroded connector can prevent proper charging. Look for rust or corrosion around the terminals.
- Field (Sensing) Wire: This wire helps the alternator adjust its output based on the system’s voltage. If it’s broken or disconnected, it can cause charging issues.
2. Check Fuses and Fusible Links
- Blown Fuses: Inspect the fuses linked to the charging system. A blown fuse can prevent the alternator from charging the battery properly.
- Fusible Links: These work like fuses but are part of the wiring. If damaged, they can interrupt the electrical flow. Use your vehicle’s wiring diagram to locate and check them for issues.
3. Voltage Regulator and Sensors
- Voltage Regulator: A faulty voltage regulator, either external or built into the alternator, can stop the charging system from working correctly. Low or fluctuating voltage readings are signs of a bad regulator.
- Sensors: Modern vehicles use sensors to monitor electrical systems. If they fail, it can prevent the alternator from charging properly. A diagnostic scan tool can help identify sensor issues.
4. Testing for Electrical Faults
- Use a Multimeter: Test the wiring for continuity and voltage to find any breaks or irregular voltage levels.
- Wiggle Test: While testing, gently wiggle the wiring and connectors. If the voltage drops or fluctuates, this may indicate a loose connection or a broken wire.
5. Bench Testing the Alternator
- Alternator Bench Test: If everything else seems fine, remove the alternator and have it bench-tested at a local store. This test isolates the alternator to check its functionality without the other system components affecting the results.
If you're struggling to diagnose or fix the problem, consider visiting CarHub Caledon Chrysler. We can help you identify and repair issues with your charging system.

What to Do If Your Alternator Fails the Test
If your alternator fails the test, CarHub has a variety of new and remanufactured alternators to fit your needs. No matter your car’s make or model, we’ve got a solution for you.
In some cases, it may be possible to rebuild your alternator rather than replace it entirely. Parts like the alternator bearing, brushes, diodes, or resistors can sometimes be replaced. However, this is a more advanced DIY project, as it requires completely disassembling the alternator, replacing the faulty components, and reassembling it with precision.
Remember, choosing a replacement alternator comes with a warranty on the assembly, giving you added peace of mind beyond what a repair might offer.

Maintenance Tips to Prevent Alternator Issues
To keep your alternator running smoothly and avoid the hassle of a premature replacement, regular maintenance is key. Here are some practical tips to extend the life of your alternator:
1. Check for Loose Connections
Regularly inspect all wiring and connectors for any loose or corroded connections. Loose connections can cause electrical resistance and put extra strain on your alternator.
2. Keep Battery Terminals Clean
Clean battery terminals regularly to prevent corrosion, which can interfere with the charging process and strain the alternator.
3. Avoid Overloading the System
Limit the use of electrical accessories that draw a large amount of power. Overloading the system can cause the alternator to work harder, reducing its lifespan.
4. Charge Instead of Jumpstarting
While jumpstarting may get you back on the road quickly, it places additional stress on the alternator. It's better to charge the battery slowly to allow the alternator to work at a steady pace.
5. Maintain a Healthy Battery
A weak or failing battery can cause unnecessary strain on the alternator. If your battery is no longer performing well, replacing it before it completely fails will help protect the alternator.
6. Check Belt Tension
Inspect the alternator belt regularly to ensure it’s properly tensioned. A loose or worn belt can prevent the alternator from charging the battery efficiently, leading to potential damage.
Routine car maintenance, including checking these components, will go a long way in preventing alternator issues and extending its lifespan. Regular inspections can catch problems early, saving you time and money down the road.
Test Today, Prevent Trouble Tomorrow
A failing alternator won’t get better on its own—it will leave you stranded. By testing yours now, you’ve taken the first smart step in preventive care. But don’t stop there:
If your test shows low voltage or fluctuations: Visit our service center for a professional diagnosis—our certified technicians can pinpoint whether it’s your alternator, battery, or wiring before it becomes an emergency.
If your results look good: Schedule a preventive maintenance check today to ensure your entire charging system stays in top shape. Our multi-point inspections catch hidden issues most DIY tests miss.
Why wait for a breakdown? Let CarHub Caledon Chrysler—your trusted dealership with factory-trained experts—keep your car running smoothly with our affordable maintenance plans and genuine parts.
Drive with confidence. Schedule your alternator check today at CarHub Caledon Chrysler!